get fit with britt // upper back & shoulders

Welcome back to Get Fit with Britt! I'm going to be posting some demos of my fave exercises taught at Pure Barre Williamsburg, with the help of their awesome instructors. Pure Barre is a fast, effective, and most importantly, safe way to change your body, and follows a technique that's high-intensity, but low impact to protect your joints! Thanks to Pure Barre, I have been able to build long, lean (not bulky!) muscles while tapering everything in & lifting it up! For this series, we will pick a particular move, explain the focus area and correct form, then demonstrate it so you can practice at home! That way, if/when you come to the studio yourself, you'll be rocking the moves & way ahead of the game ;) These exercises are also a great way to get fit at home or on-the-go! I find myself regularly using Pure Barre exercises during my hotel room workouts. Additionally, you can get all the outfits I'm wearing at the Pure Barre Williamsburg studio, so definitely go by if you're looking for some fun, new workout gear! Come & join me, get that healthy & strong body you've always wanted- come Get Fit with Britt!

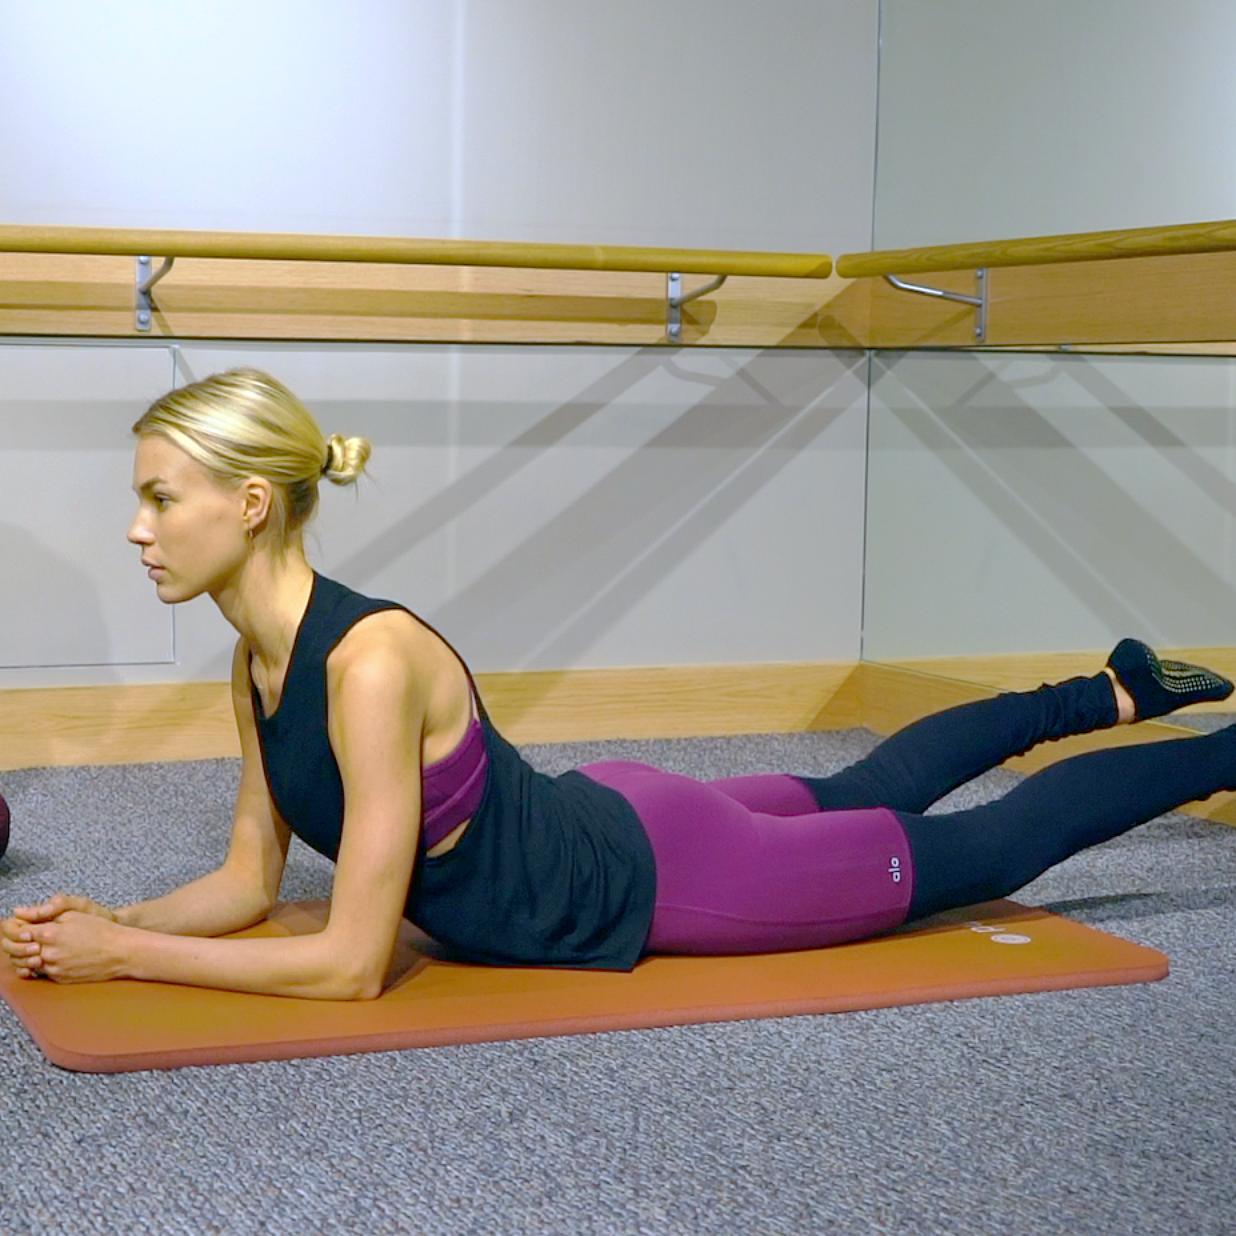
Today's exercise tones your upper back and shoulders. Holding a light set of weights (I chose 2 lb), bring your arms to 90 degree angles at your sides. Extend them all the way straight (out and up), and then bring them back to your sides (out and down). Make sure you keep a steady pace with your arms and keep the momentum out of your movement. It should feel like you're moving the weights through thick muddy water. If you have to use momentum, your weights are likely too heavy. In the next position, when you're drawing your elbows towards one another, imagine having a sheet of paper between your shoulder blades that you're trying not to drop! Squeeze those shoulder blades together! Make sure to keep a soft bend in your knees and your hips tucked under the entire time. Repeat this sequence with 10 reps of each, 3 times total.

*I am not a trainer or health professional, so please consult one if you feel you're doing something wrong or could potentially injure yourself.


skincare // in the air

Taking care of your skin during air travel is super important. All that dry, recycled air can wreak havoc on your skin, not to mention all the germs floating around, so it's a good idea to take some preventative and healing measures along the way. I wanted to share a few of my go-to products and tips (all TSA approved!) to ensure fresh and hydrated skin upon landing. First and foremost, drink tons of water. I always bring a refillable water bottle, and fill it up before boarding (post-security), and then have the flight attendants refill it multiple times throughout the flight. This is key for staying hydrated from the inside, out. In terms of skin, I always try to fly makeup-free, with freshly cleansed and moisturized skin. This will help get you started on the right foot. I always keep some type of face mist in my carry-on, whether it's Caudalie Beauty Elixir or Avène Thermal Spring Water Spray. A spritz or two is always a nice, refreshing pick-me-up when my skin starts to feel stale or parched. If you really want to take your face spritz to the next level, I suggest investing in The Pocket Spa by Kelley Quan. This compact, refillable personal humidifier hydrates and moisturizes your skin using only water, leaving you with youthful and dewy-fresh skin! It also prepares the skin for and increases the efficacy of all your other products to follow. Once the skin is prepped, I apply moisturizer: I'll either bring an oil like Sunday Riley Juno Hydroactive Cellular Face Oil, or a moisturizer like Osmia Organics Purely Simple Face Cream, both of which are great at locking in moisture. I also make sure to have a thick ointment, like Glossier balm dotcom or Lano Lips 101 Ointment Multipurpose Superbalm, which can be used on your face & lips, hands & cuticles, or any other dry spots you may have. For longer flights, and maybe if I have a bit of privacy in business class, I'll bring a sheet mask like Hada Labo Ultimate Anti-Aging Facial Mask or SK-II Facial Treatment Mask. These may look silly while they're working their magic, but I promise your skin will thank you upon arriving. Maybe you're not willing to go this far in public, and that's alright- just apply one once you've reached your final destination. Lastly, I love this Aesop Ginger Flight Therapy. It's said to give an invigorating sensory lift when applied to your pulse points during times of stress or nausea. If nothing else, it leaves you smelling lovely with the aroma of lavender, macadamia nut, sweet almond, and ginger oils. By incorporating these tips and products into your travel routine on a regular basis, I hope you'll notice an improvement in your skin's overall look and feel just as I have.

get fit with britt // pure barre ledge

Welcome back to Get Fit with Britt! I'm going to be posting some demos of my fave exercises taught at Pure Barre Williamsburg, with the help of their awesome instructors. Pure Barre is a fast, effective, and most importantly, safe way to change your body, and follows a technique that's high-intensity, but low impact to protect your joints! Thanks to Pure Barre, I have been able to build long, lean (not bulky!) muscles while tapering everything in & lifting it up! For this series, we will pick a particular move, explain the focus area and correct form, then demonstrate it so you can practice at home! That way, if/when you come to the studio yourself, you'll be rocking the moves & way ahead of the game ;) These exercises are also a great way to get fit at home or on-the-go! I find myself regularly using Pure Barre exercises during my hotel room workouts. Additionally, you can get all the outfits I'm wearing at the Pure Barre Williamsburg studio, so definitely go by if you're looking for some fun, new workout gear! Come & join me, get that healthy & strong body you've always wanted- come Get Fit with Britt!

Today's exercise focuses on the area where your seat meets the back of your leg. At Pure Barre, we call this area your "pure barre ledge", because you're essentially working to create a ledge where your booty pops out from the back of your legs. I love this position because, yet again, you get to relax most of your body on the ground (do you see a trend here?), all while really focusing the work on your seat. Adding a resistance band around your ankle adds an extra challenge here, but feel free to do this exercise without it as well. Rest your head on your arms, flex your foot, and keep your hips tucked under. Make sure to initiate each movement with a squeeze in the back of your seat as opposed to just moving your leg. This will ensure you maintain a smaller range of movement, and are able to tone the target area effectively. Repeat three sets of ten reps for a killer seat workout!

*I am not a trainer or health professional, so please consult one if you feel you're doing something wrong or could potentially injure yourself.


fave products // sunday riley luna night oil


Luna Sleeping Night Oil by Sunday Riley has been a true savior ever since I incorporated it into my skincare regimen. This retinoid oil helps improve skin's plumpness while fighting the appearance of wrinkles, pores & redness, all while you sleep! Wake up to glowing, luminous, and more youthful looking skin. Blue tansy and German chamomile essential oils are rich in soothing blue azulene, which helps to calm irritated or sensitive skin, leaving you with a beautiful even-toned complexion! I love that Sunday Riley's products are formulated without parabens, sulfates & phthalates, and are all cruelty-free! Luna Sleeping Night Oil is proven to improve skin's radiance, smoothness & fine lines, and the mix of retinol ester & potent botanicals is sure to transform your skin for the better!


get fit with britt // inner & outer thighs

Welcome back to Get Fit with Britt! I'm going to be posting some demos of my fave exercises taught at Pure Barre Williamsburg, with the help of their awesome instructors. Pure Barre is a fast, effective, and most importantly, safe way to change your body, and follows a technique that's high-intensity, but low impact to protect your joints! Thanks to Pure Barre, I have been able to build long, lean (not bulky!) muscles while tapering everything in & lifting it up! For this series, we will pick a particular move, explain the focus area and correct form, then demonstrate it so you can practice at home! That way, if/when you come to the studio yourself, you'll be rocking the moves & way ahead of the game ;) These exercises are also a great way to get fit on-the-go! I find myself regularly using Pure Barre exercises during my hotel room workouts. Additionally, you can get all the outfits I'm wearing at the Pure Barre Williamsburg studio, so definitely go by if you're looking for some fun, new workout gear! Come & join me, get that healthy & strong body you've always wanted- come Get Fit with Britt!

Today's workout focuses on thighs, specifically your inner & outer thighs. Adding a tube around both of your thighs during this exercise increases the challenge and allows you to really intensify the burn you'll feel. As you move your legs in & out, make sure to control the movement in both directions (instead of just releasing the tension in the tube), so that you can effectively work both the inner and outer thighs at the same time. Stay up high on your tip toes, with your heels together & toes apart, maintain a relaxed grip on the bar, and as always, keep your hips tucked under. Do three sets of 10 reps of each movement for a workout that's sure to get your legs summer-ready in a jiffy!

*I am not a trainer or health professional, so please consult one if you feel you're doing something wrong or could potentially injure yourself.


glow facial mask

While I have a daily skincare regimen that I like to follow, I also have some "once-a-week" or "once-a-month" rituals that are just as important. Face masks can be a great way to hydrate & rejuvenate your skin, and these days you can find them in several versions- think sheet, gel, or clay. One of my favorite ways to mask is by creating my own in the comfort of my own kitchen! That way, I know exactly what's going into it, as well as the benefits each ingredient offers my skin. Think about it this way- you cook your own food to control what you put into your body, and to nourish it from the inside out. Creating your own face mask allows you to take the same approach, and nourish your body from the outside, in! While it may look like baby food, I'd happily eat this mask any day (it's that delicious)! My glow facial mask will help take your skin from dry & dull to healthy & glowing! It boasts many impressive qualities to help your skin look & feel its best- Greek yogurt acts as an anti-inflammatory & can calm the skin; avocado works as a soothing moisturizer; oats are used to exfoliate & remove dead skin; apple cider vinegar has anti-inflammatory properties & helps reduce redness; lemon juice acts as an astringent to brighten & tighten skin; honey fights off bacteria & hydrates, leaving your skin soft & supple; turmeric reduces inflammation & pigmentation, and is high in antioxidants. So as you can see, this is a nutritional powerhouse for your skin. Glowing & radiant skin awaits, so get to masking!

Glow Mask:

  • 2 tbsp Greek yogurt, plain & unsweetened
  • 1/4 cup avocado, mashed
  • 1/4 cup rolled oats
  • 2 tsp apple cider vinegar
  • 1 tsp fresh lemon juice
  • 1 tbsp raw honey
  • 1/2 tsp ground turmeric

Mix all ingredients together in a bowl, making sure everything is incorporated evenly. Set bowl in refrigerator or freezer for 15-20 minutes to chill, which allows ingredients to come together & adds a bonus cooling effect bonus for your skin. Massage evenly onto skin, and leave it to set for 15-20 minutes. Scrub off thoroughly with warm water. Pat skin dry. Spritz face with rosewater & moisturize. Makes enough for two masks. Can be kept fresh in the refrigerator for 3-5 days.

*Because turmeric can stain your skin if left on for a long time, you may want to wear gloves when applying this mask. Also be sure to fully remove it when rinsing (a wash cloth helps)!

**If you prefer a smooth mask, you may choose to blend before chilling. Pulse until no chunks remain, and the oats are pulverized.